


How to Create an AI Agent with ChatGPT Agent Builder
Delivering exceptional customer experiences quickly and efficiently is crucial for any business.
And the ChatGPT agent builder empowers you to create intelligent AI agents that not only automate repetitive tasks but also engage customers with personalized, natural conversations—all without requiring deep technical expertise.
Whether you’re aiming to reduce support ticket volume, streamline scheduling, or boost sales through smart recommendations, this platform offers an easy, scalable way to build, test, and deploy AI agents tailored to your unique needs.
In this guide, we’ll walk you through how to harness the power of the agent builder to transform your workflows, save time, and enhance customer satisfaction.
What is Agent Builder, and Who is it For?
The agent builder is a user-friendly, web-based platform developed by OpenAI that allows developers and businesses to build AI agents capable of understanding and responding to natural language inputs.
Unlike traditional chatbot frameworks that require extensive programming, this tool provides a blank canvas equipped with nodes, workflows, and tools to construct agentic workflows that can handle complex conversations and tasks.
The builder relies on a network of nodes including Start Node, Agent Nodes, Logic Nodes, and Tools to manage interactions and workflows effectively. Agent Builder supports multiple nodes including Agent, MCP, and Guardrail for building custom agents.
OpenAI's Agent Builder includes 12 nodes categorized into Core, Tools, Logic, and Data, offering a comprehensive framework for building custom agents.
Ideal for developers, product managers, and customer support teams, the ChatGPT agent builder is designed to efficiently create AI agents that can;
- Automate repetitive tasks
- Handle user queries
- Integrate with external systems through APIs, leveraging hosted MCP servers to connect to a variety of tools and services seamlessly.
Whether you need an agent for customer service, marketing automation, or internal workflow management, this platform offers the flexibility and scalability to meet your needs without spending hours on complex development.
Designing with the end goal in mind helps address crucial questions about verification and risk early in the process, ensuring a more effective and reliable agent.
Choosing a specialized model fine-tuned on specific tasks may result in more effective agents based on their intended function.
Step-by-Step Guide to Creating an AI Agent with ChatGPT Agent Builder
Creating an AI agent with the ChatGPT agent builder involves a series of intuitive steps that guide you from initial setup to deployment and ongoing monitoring.
Let’s walk through the process in detail.
Step 1: Access the Agent Builder Platform
To begin, navigate to https://platform.openai.com/agent-builder and sign in with your OpenAI account credentials.
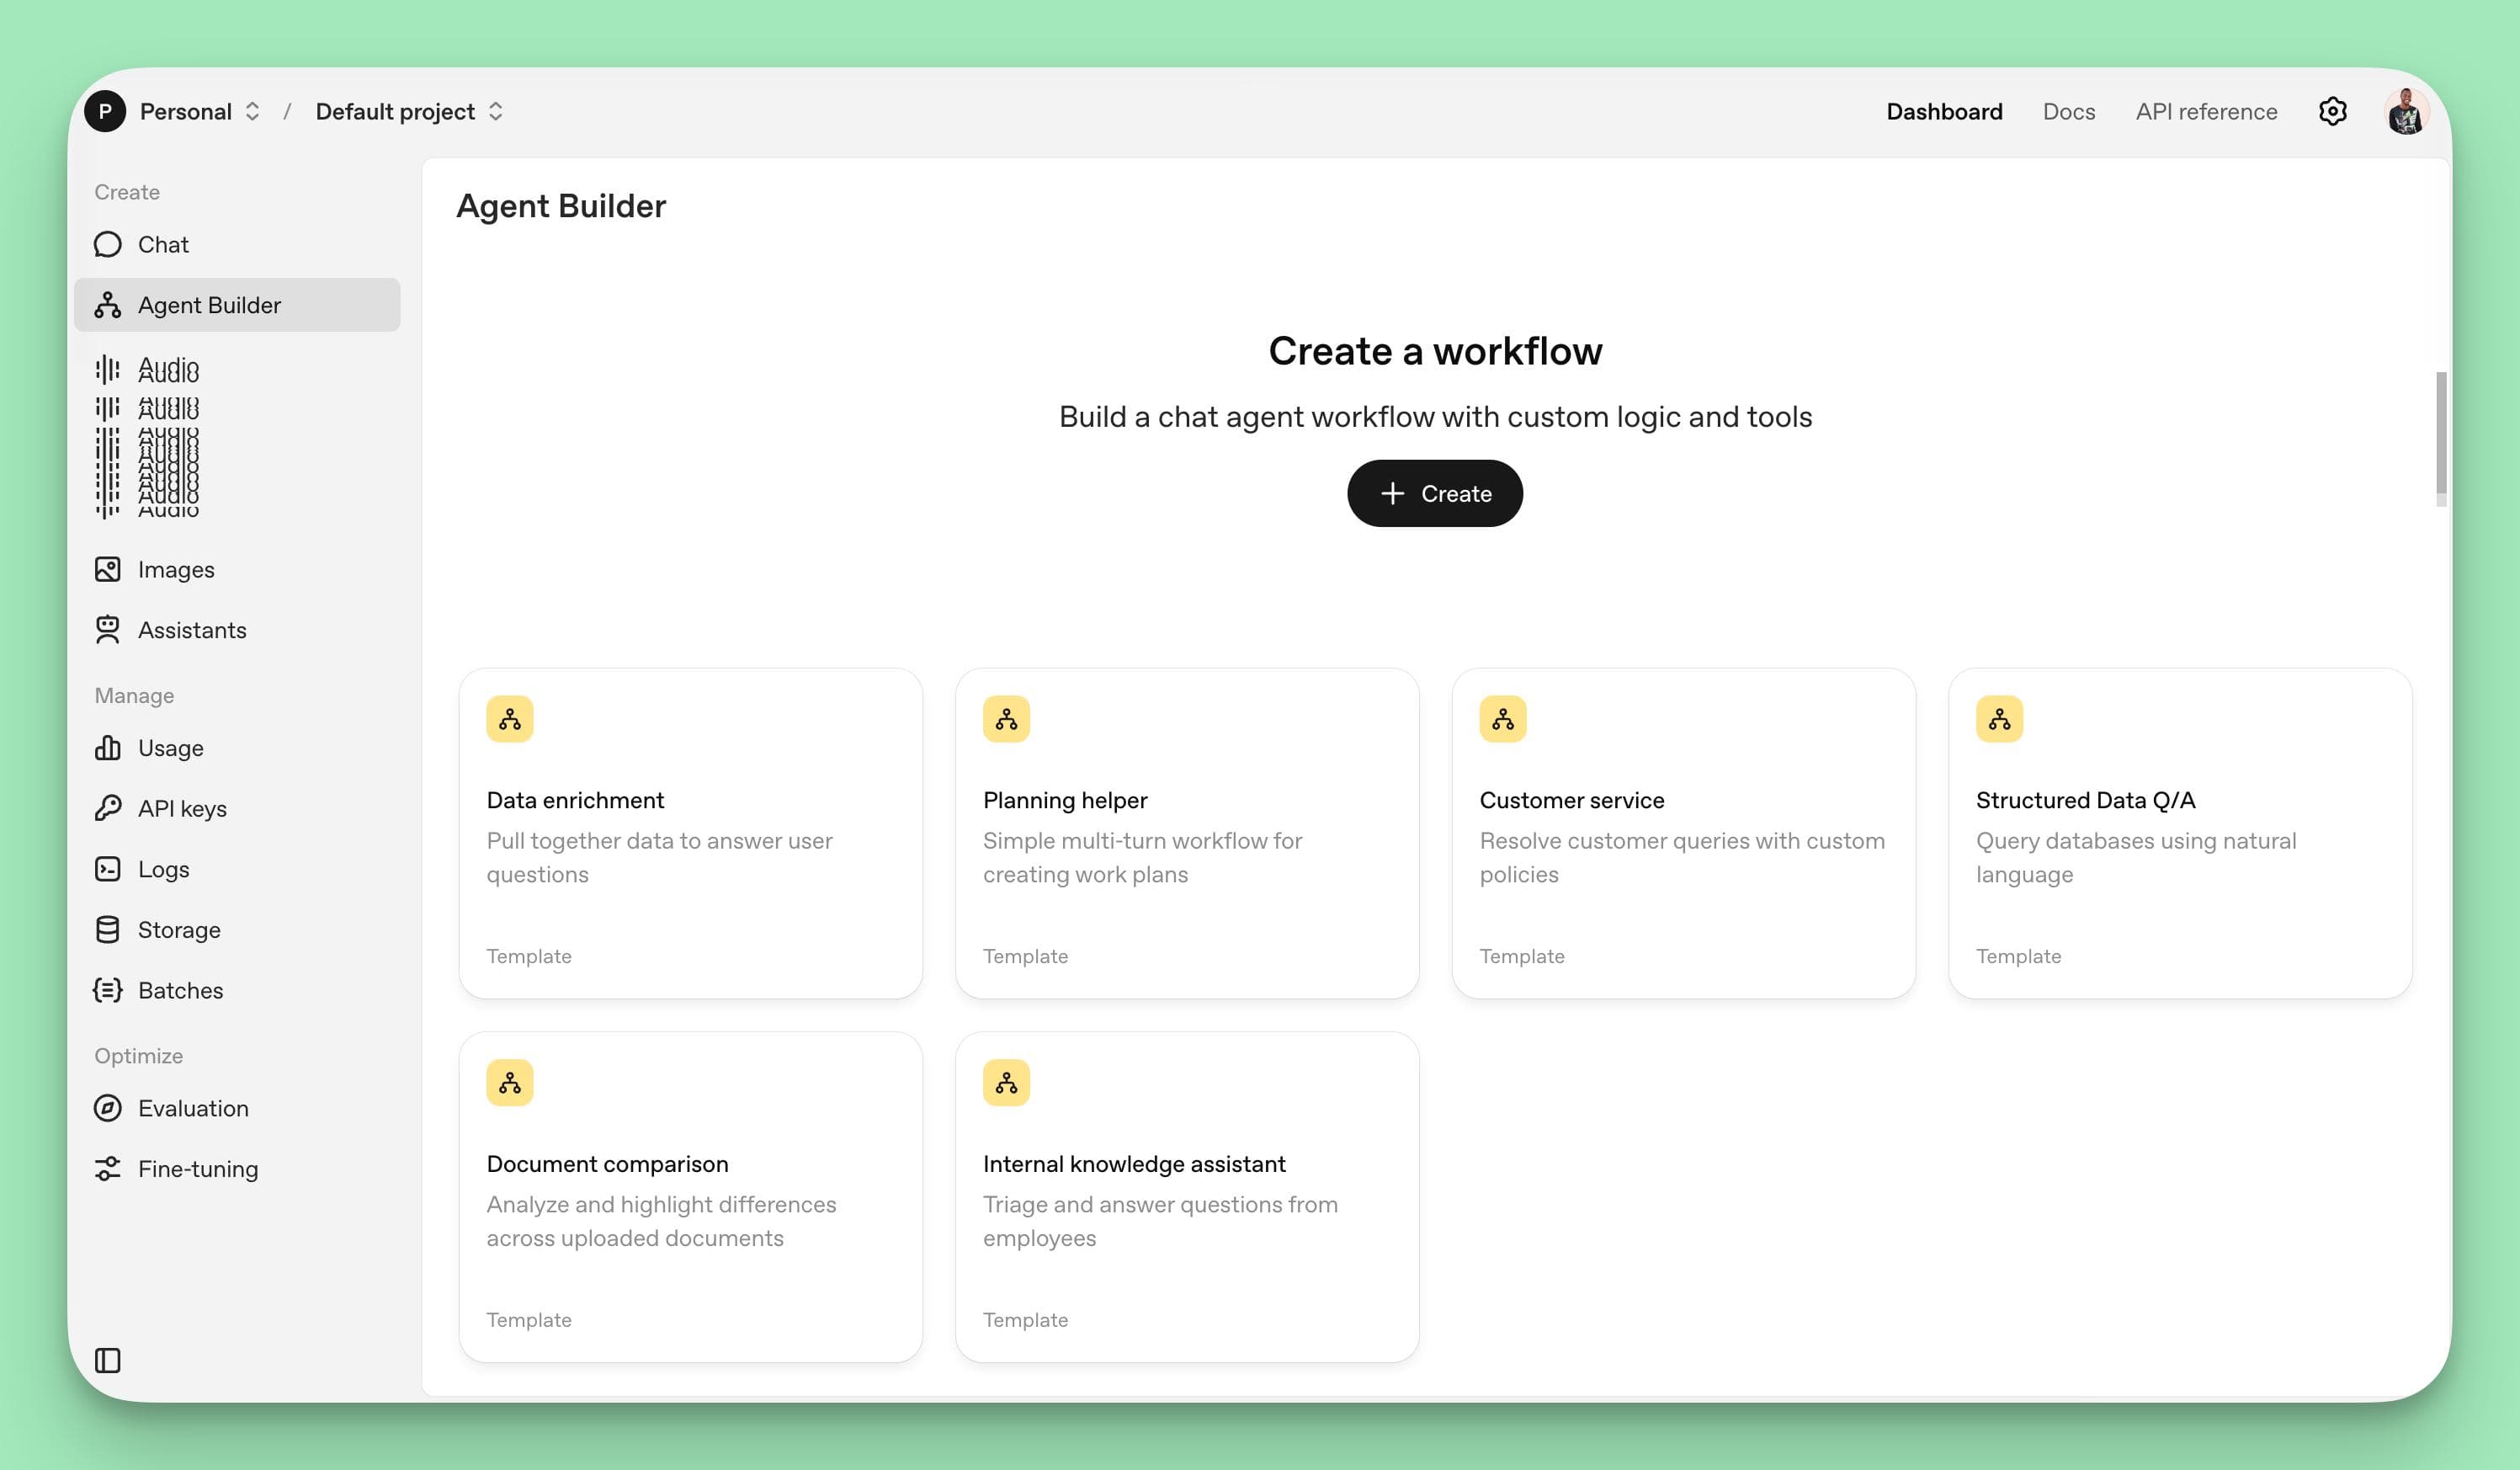
Once logged in, go to your account settings to add billing details, which are necessary to enable the agent preview mode.
The platform interface features three main tabs:
- Workflows: Displays your published agents.
- Drafts: Contains agents currently under development.
- Templates: Offers pre-built examples to jumpstart your project. Developers can get started with Agent Builder by using prebuilt templates or a blank canvas.
For example, if you're building a customer support agent for an e-commerce store, click Create New Workflow to start with a blank canvas and begin designing your agent from scratch.
Step 2: Configure the Start Node
Every agent workflow begins with a Start Node, which defines the initial input variables your agent will receive.
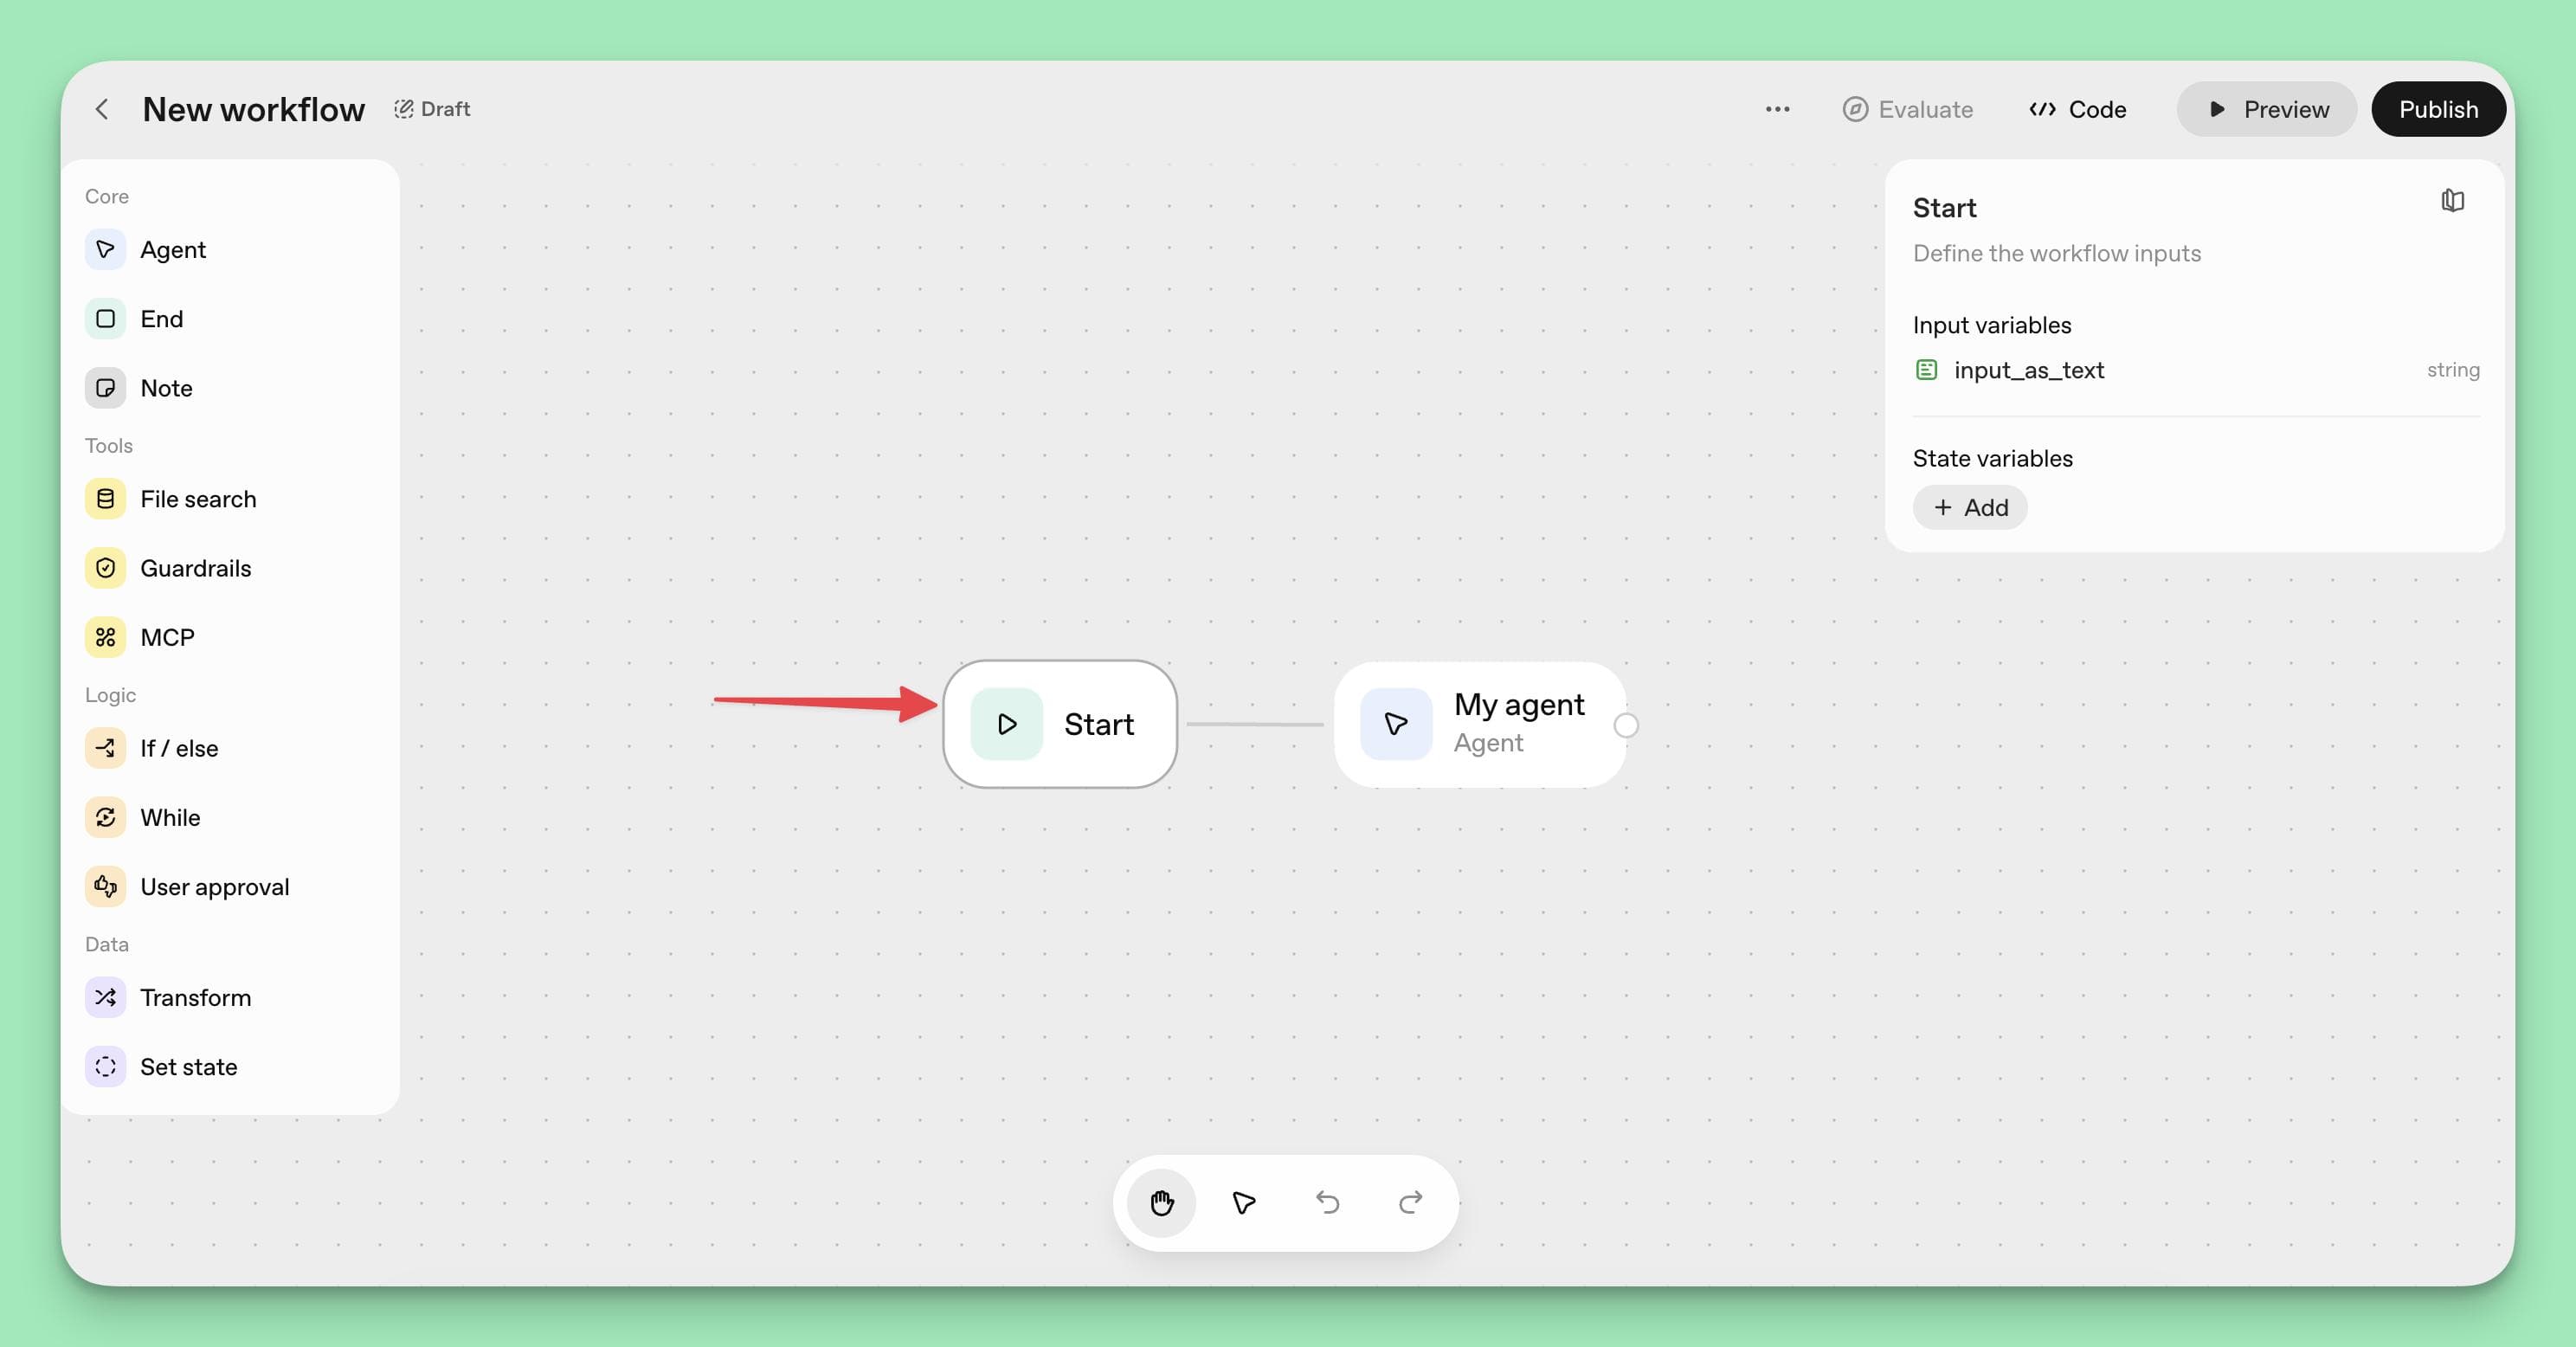
Click on the Start Node to configure these inputs, which can include user-provided text or persistent state variables that the agent accesses throughout the conversation.
For instance, if you're building a travel booking agent, you might create input variables such as "destination" and "travel_dates."
Additionally, state variables like "user_preferences" and "budget_range" can be set to persist across multiple interactions.
This allows your agent to maintain context and provide personalized responses.
To further enhance memory management, conversational history can be stored in a short-term buffer while structured, long-term memory is utilized for retaining critical information.
Step 3: Add Safety with Guardrails
To ensure your agent operates safely and complies with legal and ethical standards, add a Guardrail Node by dragging it onto the canvas and connecting it to the Start Node.
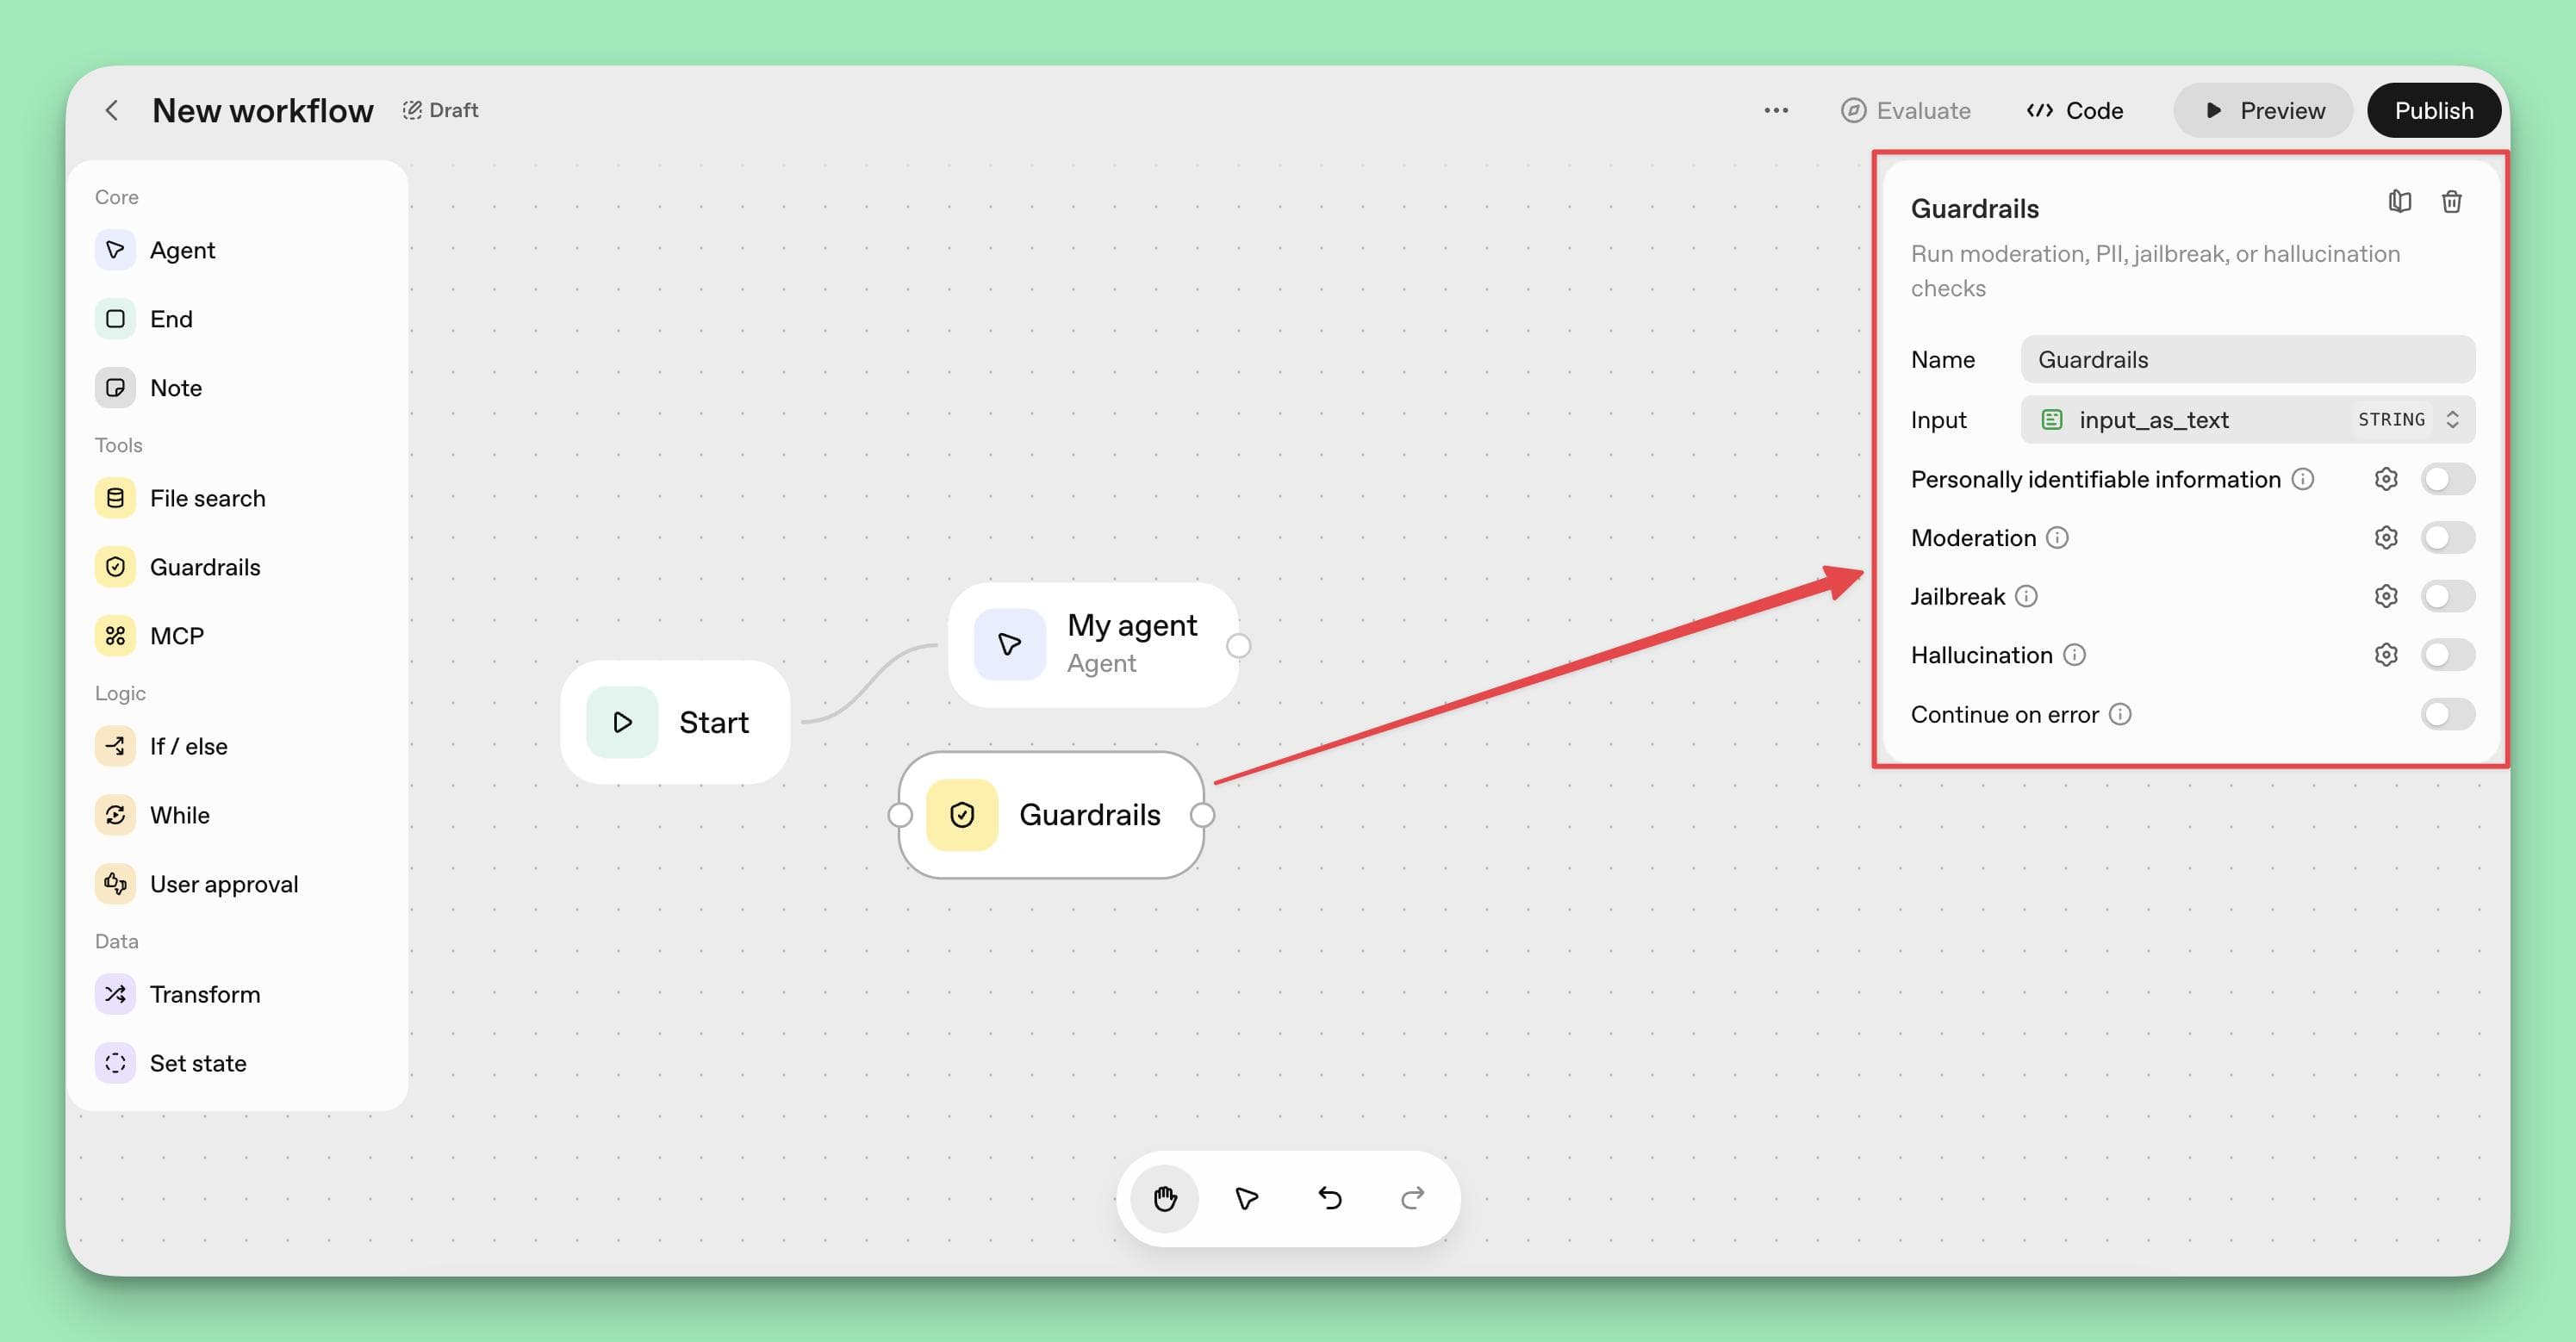
This node enables important safety features, including:
- PII detection and redaction to protect sensitive user information.
- Content moderation to block harmful or inappropriate inputs.
- Jailbreak detection to prevent prompt injection attacks.
- Hallucination verification to reduce misinformation.
For example, a healthcare appointment scheduler would benefit from enabling PII redaction to automatically detect and protect patient names, phone numbers, and medical record numbers, while also blocking inappropriate language to maintain professionalism.
Step 4: Set Up the Agent Node
The Agent Node is the core of your AI agent’s intelligence. Drag it onto the canvas and connect it to your Guardrail Node.
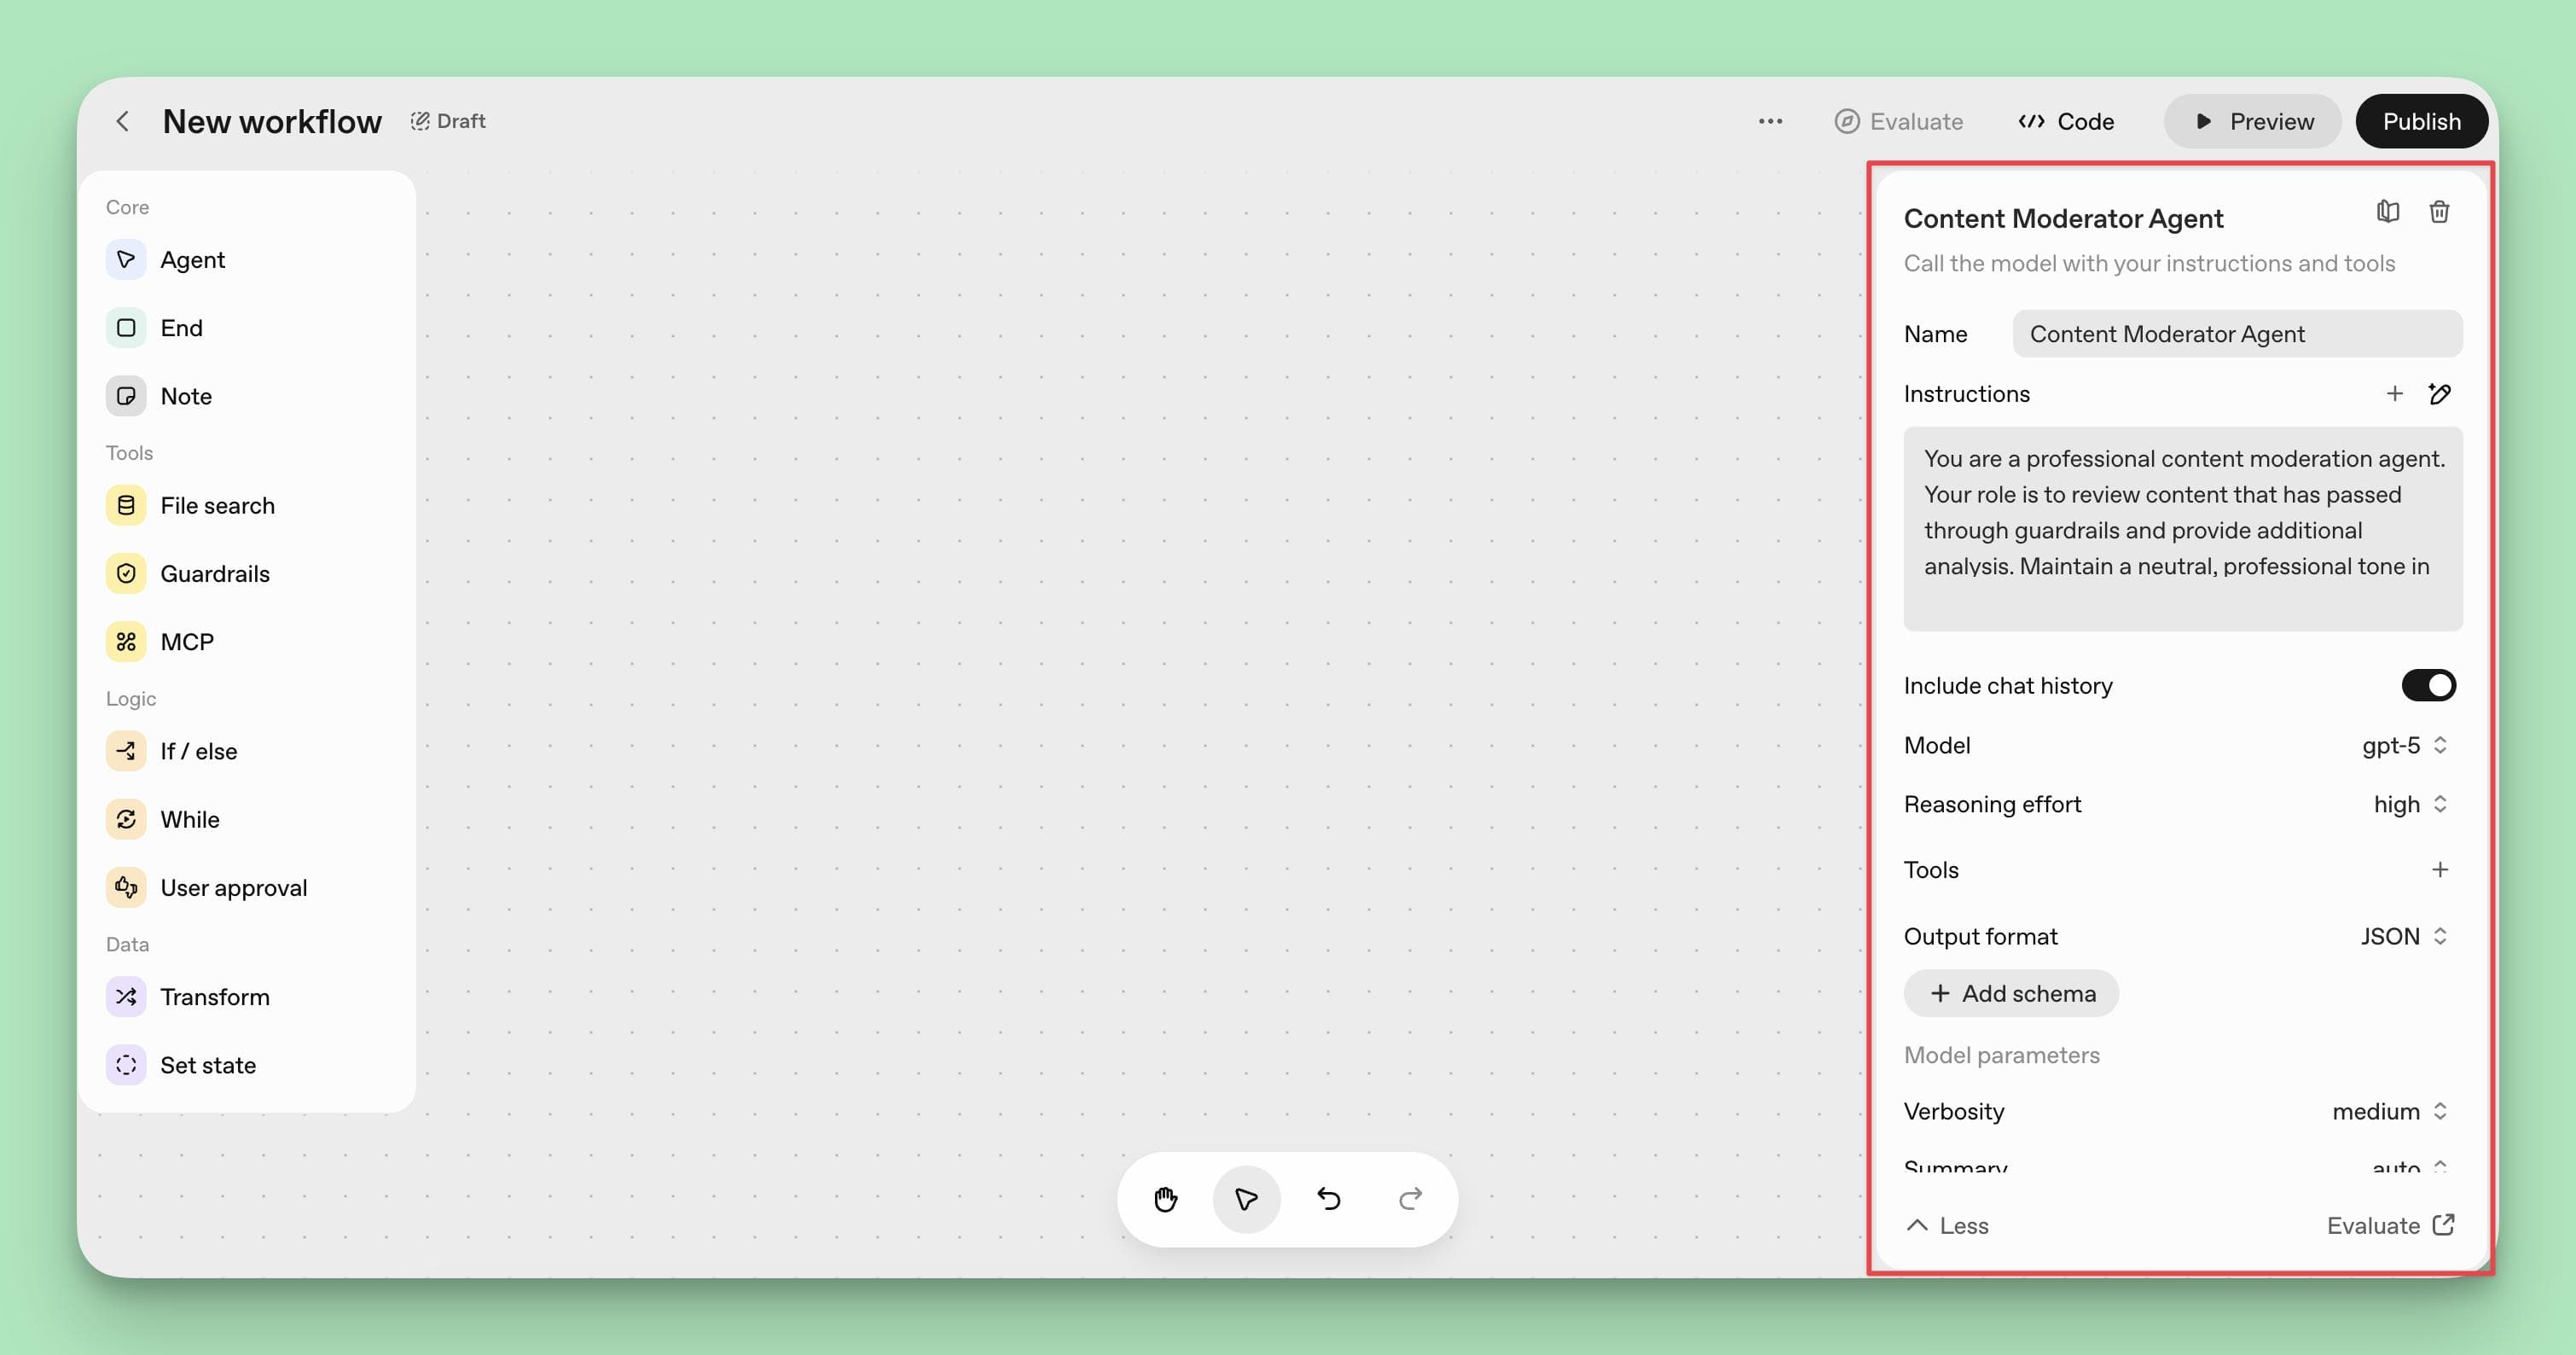
Here, you configure your agent’s behavior and capabilities by:
- Naming your agent: Choose a descriptive name, such as "Healthcare Appointment Assistant."
- Writing detailed instructions: Provide clear guidance for the agent’s role and tone. For example, "You are a helpful medical appointment scheduler. Check availability, suggest slots, confirm bookings, and always ask for patient ID. Be empathetic and professional."
- Enabling chat history: Toggle this on to maintain conversation context across multiple messages.
- Selecting your model: Choose between models like GPT-4o for complex reasoning or GPT-5-mini for faster, cost-effective responses. Use the "dumbest agent that can do the job" for predictability and reliability.
- Setting reasoning level: Adjust from low (faster) to high (more thoughtful) depending on task complexity.
- Choosing output format: Select text for conversational replies, JSON for structured data, or widgets for interactive elements.
As an example, a product recommendation agent might have instructions like:
"Analyze customer preferences from browsing history, suggest 3-5 products with brief explanations, and ask clarifying questions about budget and style preferences."
Step 5: Add Tools and Integrations
To expand your agent’s functionality, connect specialized tools and external services through the Connector Registry:
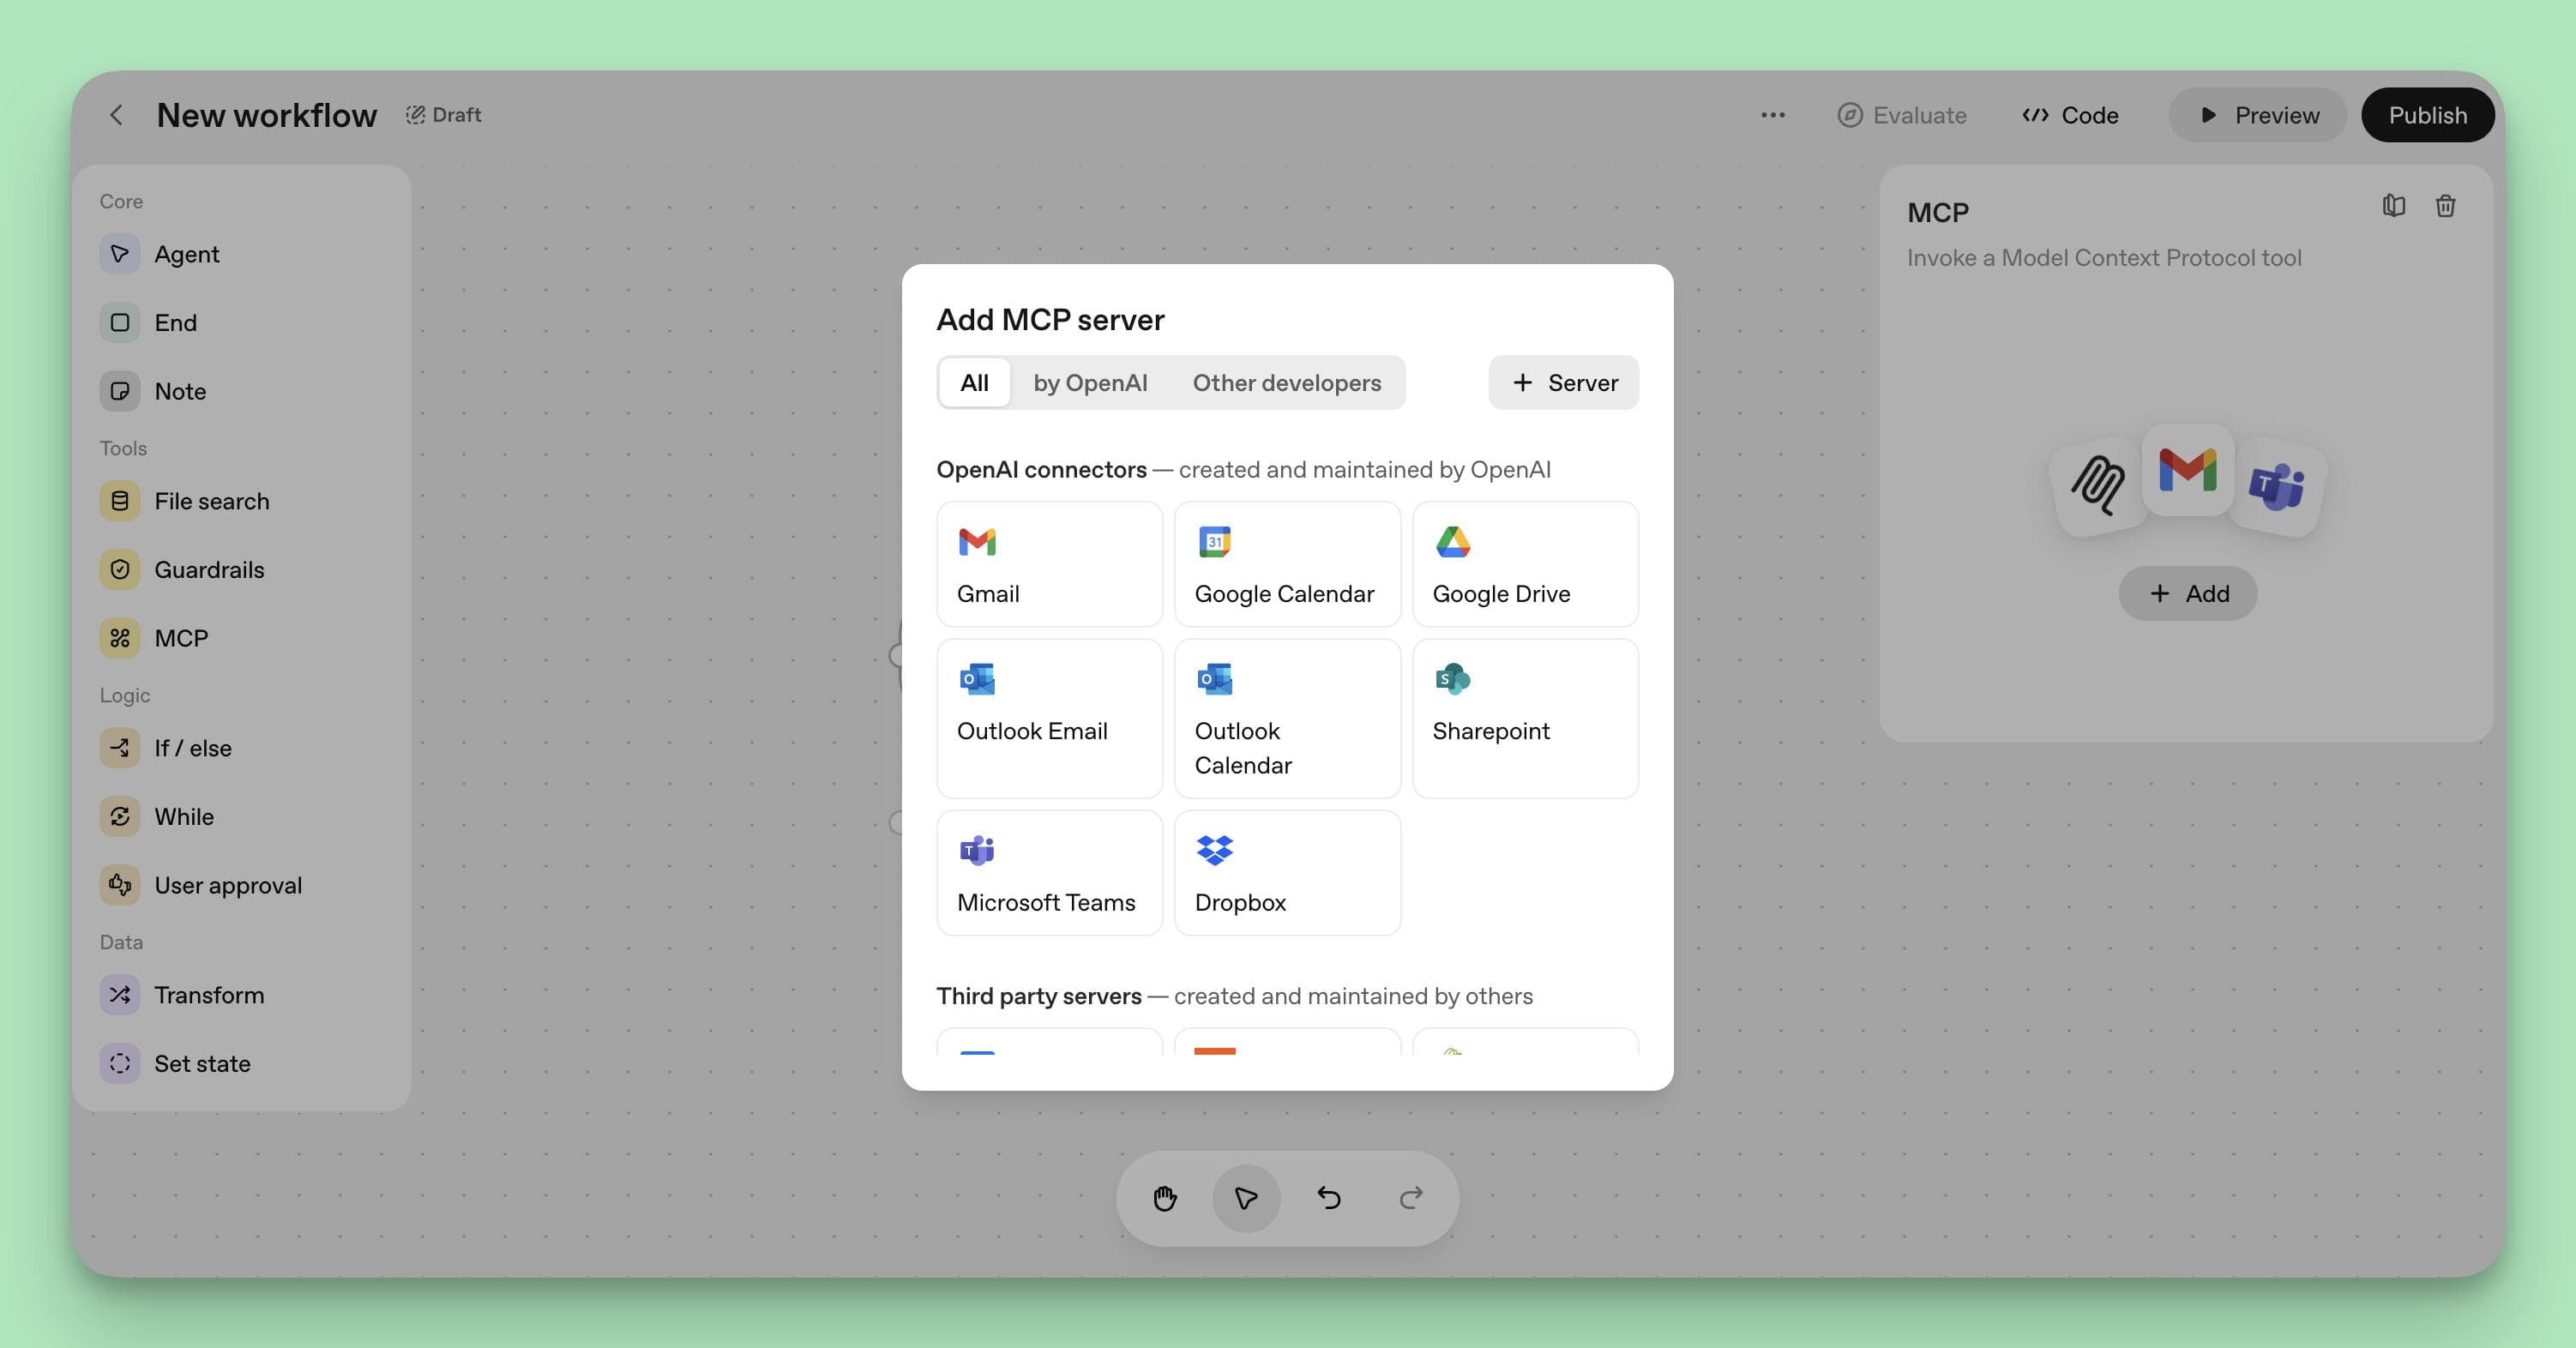
- File Search: Enables Retrieval-Augmented Generation (RAG) to search uploaded documents or knowledge bases. Upload your product catalogs, FAQs, or policy manuals for the agent to reference.
- MCP (Model Context Protocol) Servers: Connect to external apps like Gmail, Google Drive, Slack, Notion, or CRM systems. Authenticate each service to allow your agent to interact with these platforms. Agent Builder allows users to connect to a variety of tools using hosted MCP servers. Integrate external tools responsibly by connecting agents to APIs and external databases to expand their capabilities.
For example, a marketing automation agent could connect to Gmail for managing email campaigns, Google Sheets for data tracking, and Slack for team notifications, while uploading brand guidelines and past campaign documents for context.
The Connector Registry allows enterprises to manage data across multiple workspaces and organizations easily.
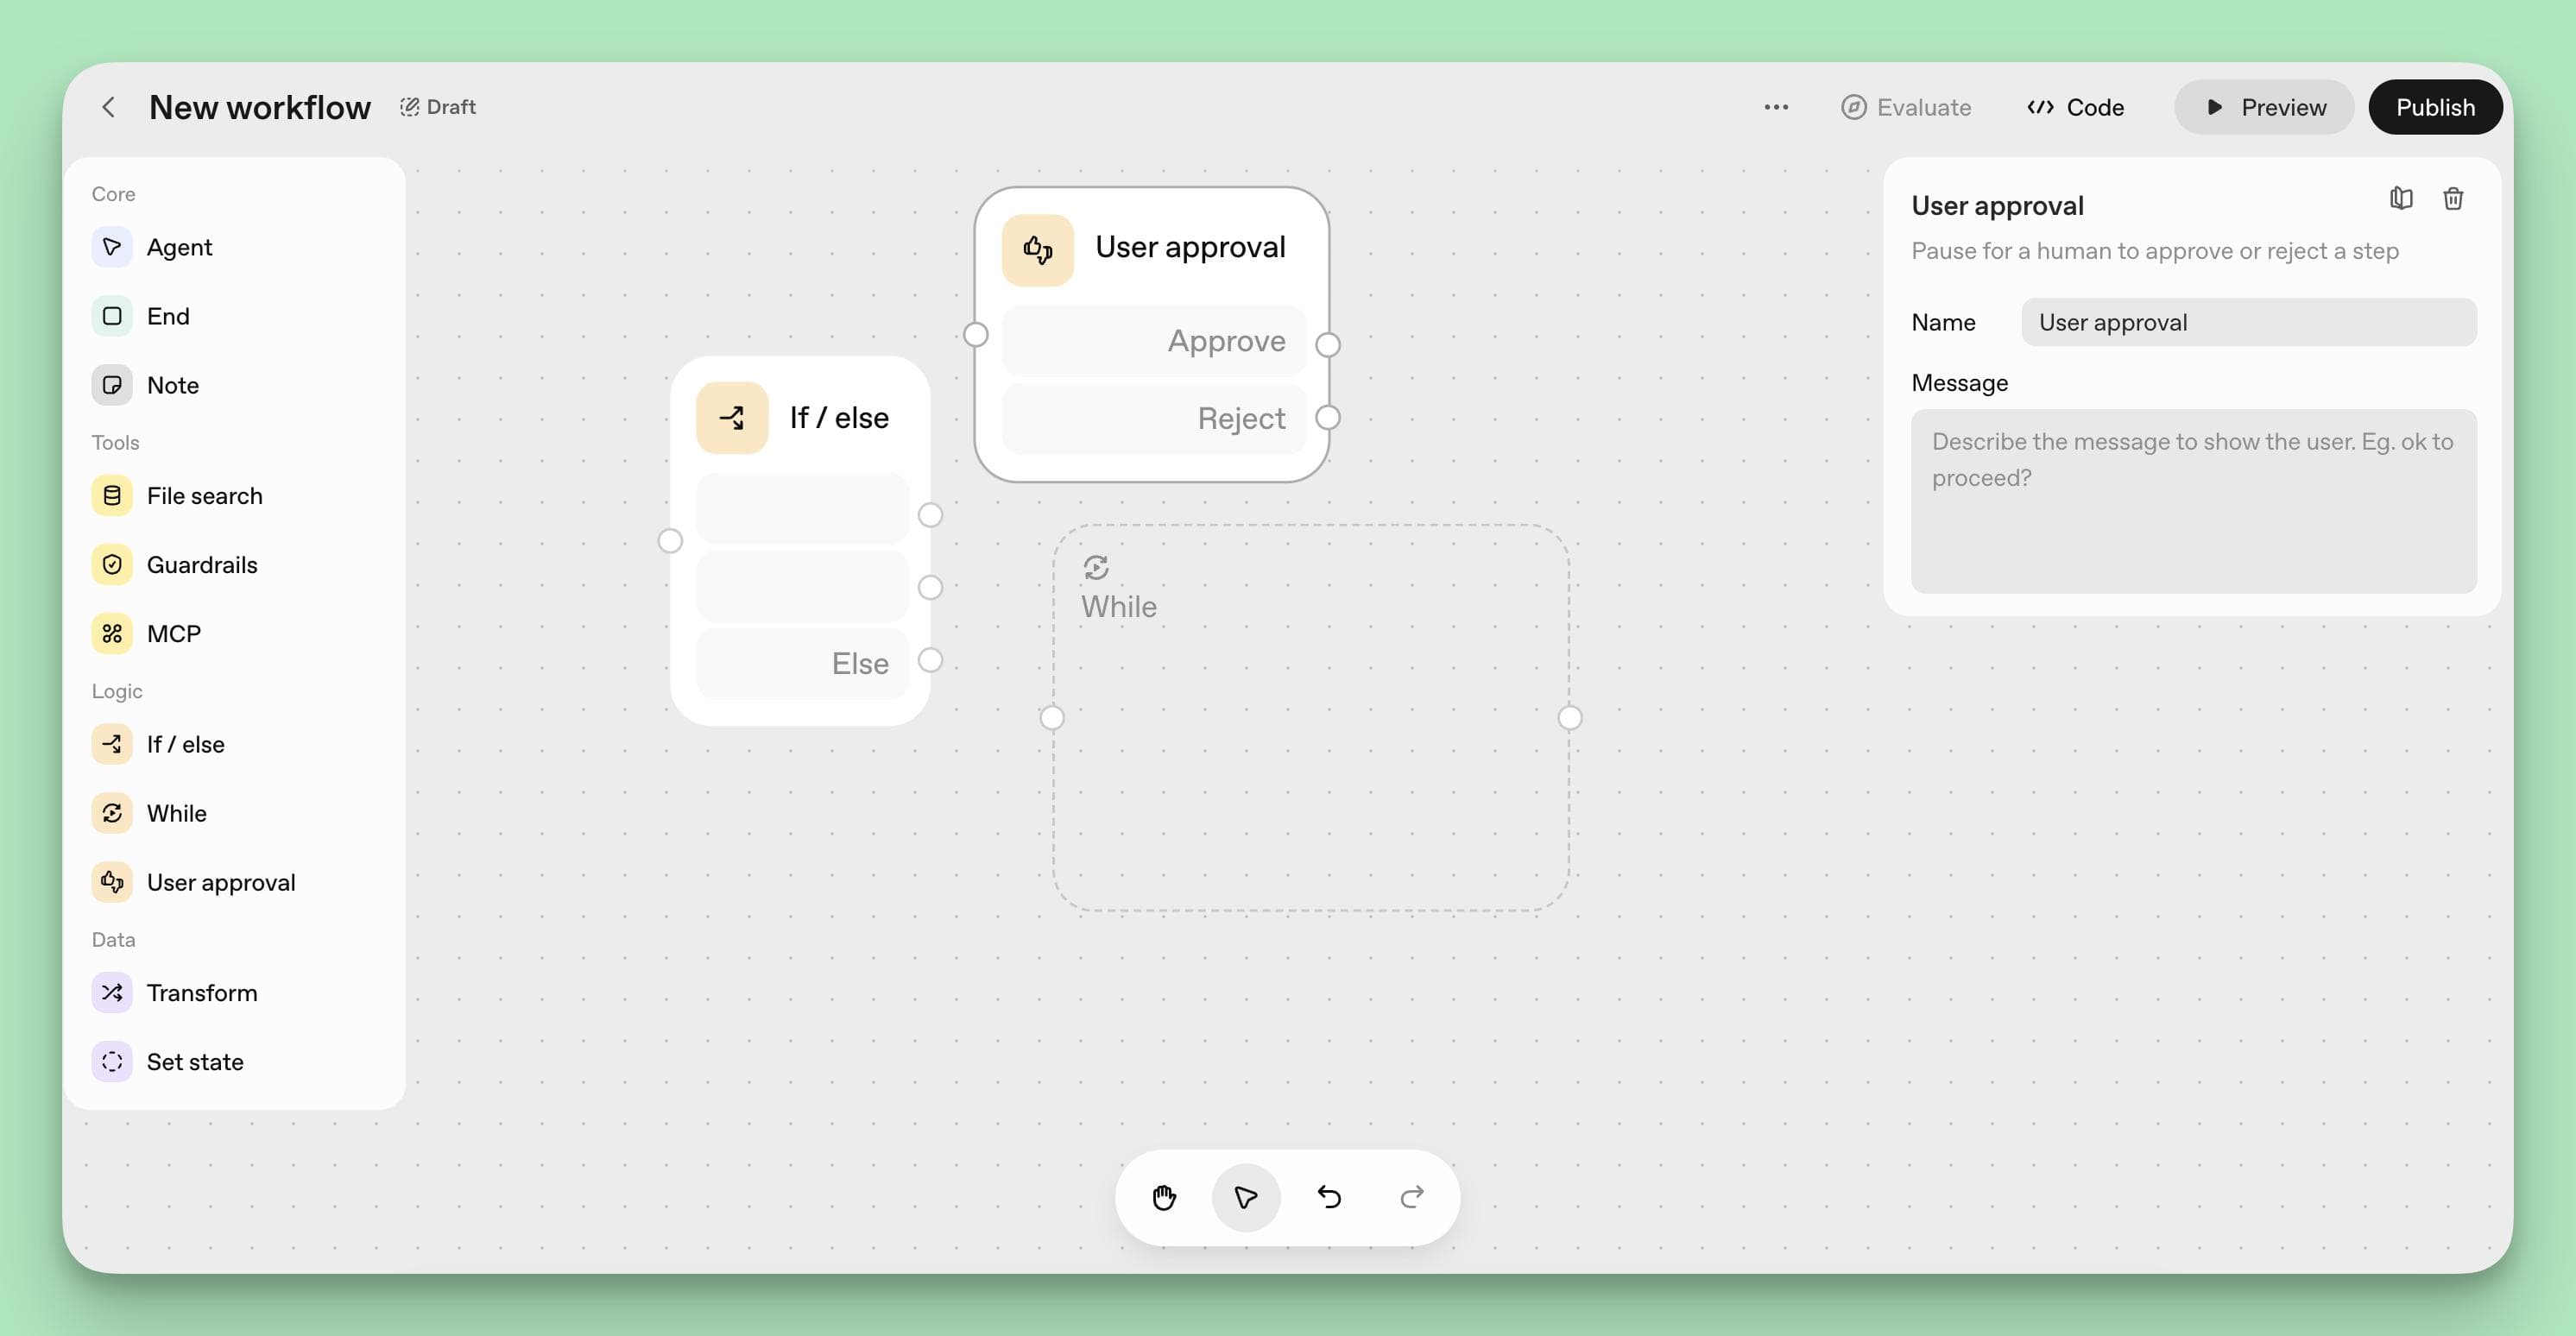
Step 6: Implement Logic and Branching
Use If/Else Nodes to add conditional logic that handles different scenarios within your workflows. Incorporate While Loop Nodes for repetitive tasks, and User Approval Nodes for actions that require human confirmation.
Chain together several simple, specialized agents for different tasks to create clearer audit trails and facilitate debugging.
For example, after processing an order, you might create a branch:
"If order value > $500, route to User Approval Node for manager confirmation; otherwise, proceed to End Node with order confirmation."
Step 7: Transform and Store Data
Add a Transform Node to modify or format data as it passes through the workflow.
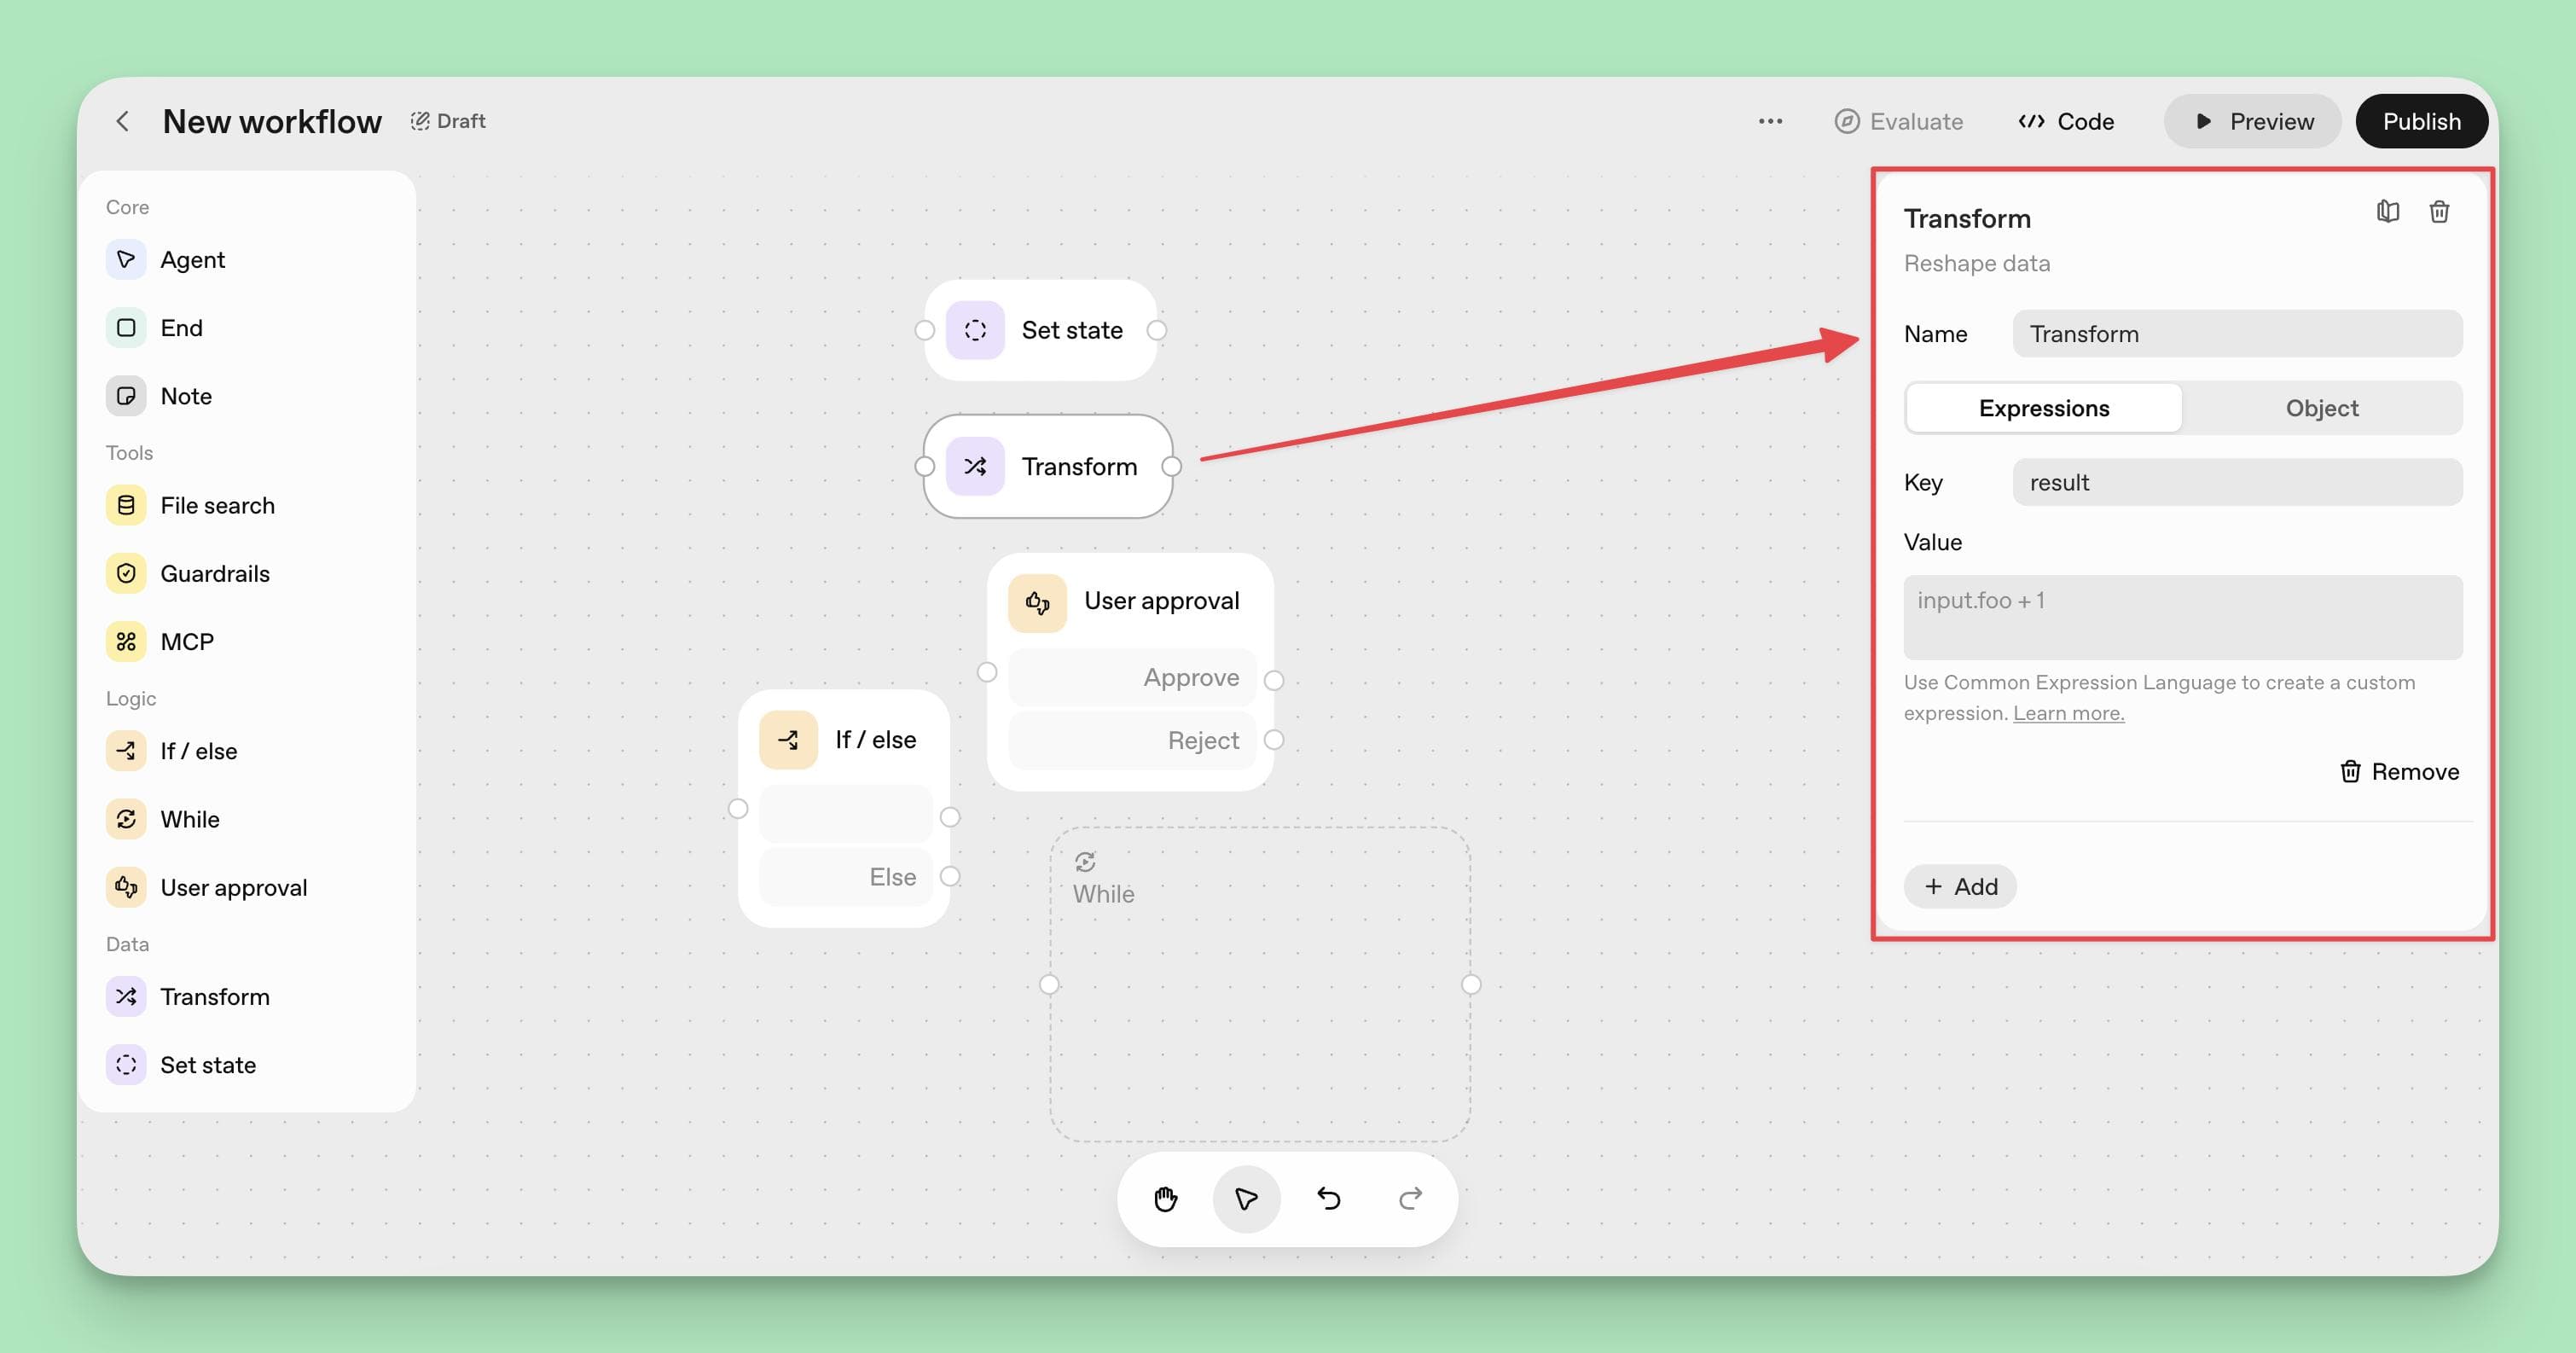
Use a State Node to save important information for later retrieval or processing.
For instance, after collecting customer details, transform unstructured text into structured JSON like:
{"customer_name": "John Doe", "order_id": "12345", "issue": "delivery delay"}
Then store this data in a State Node for future reference or integration with other systems.
Step 8: Test Your Agent
Click the Preview button located in the top-right corner to open a chat window where you can interact with your agent in real time.
Test various inputs, including edge cases, to observe how the agent responds. The preview mode displays intermediate steps such as activated nodes and the agent’s reasoning, helping you debug and refine your workflows. Implement robust testing strategies that involve unit testing, user testing, and error handling tests to ensure the agent functions correctly.
The agent builder allows real-time testing of agent behavior through an in-app preview pane as changes are made, enabling rapid iteration and improvement.
For example, test a customer support agent with queries like "I need to return a defective product," "Where is my order #12345?," and "Can I change my shipping address?" to ensure it handles diverse scenarios effectively.
Step 9: Evaluate Performance
Leverage the built-in Evaluation System to measure your agent’s accuracy and reliability.
Create evaluation datasets containing expected inputs and desired outputs, then run automated tests to verify performance.
For example, design 20 test conversations covering common customer support cases.
Aim for 90%+ accuracy in correct responses and proper routing to actions like ticket creation or escalation.
Step 10: Publish and Deploy
Once satisfied with testing, click Publish to deploy your agent. Choose your deployment method based on your use case:
- Expose the agent as an API endpoint via the Responses API for programmatic access.
- Embed the agent directly into your website or help center using ChatKit embed code.
- Export the workflow as TypeScript or Python code for custom integrations, allowing further modifications to suit specific requirements. Users can export agent logic from Agent Builder as Typescript or Python code for further modifications.
For instance, to add a chatbot to your website’s support page, use the ChatKit embed code.
For backend automation, deploy the agent as an API and connect it to your existing ticketing system to streamline workflows.
Step 11: Monitor and Iterate
After deployment, continuously monitor conversation logs and gather user feedback to improve your agent.
Track key metrics such as response accuracy, task completion rates, average conversation length, and user satisfaction scores. Set aside time for monthly reviews and adjustments to adapt to evolving requirements and emerging edge cases as an agent is not a set-and-forget solution.
Update your agent’s instructions, add new knowledge sources, or adjust guardrails to address issues.
For example, if your booking agent struggles with date formats, enhance instructions to handle various inputs like MM/DD/YYYY, written dates, or relative terms like "next Tuesday."
If users frequently ask about topics outside the current knowledge base, upload additional documentation to File Search.
Create Your Customer Support Agent with Helply
For SaaS and e-commerce companies looking to reduce Tier-1 support load and improve customer satisfaction, Helply offers a cutting-edge AI support agent built on similar principles.
Helply integrates seamlessly with help desks and knowledge bases, automatically resolving over 70% of customer inquiries 24/7.
Its Knowledge Base Concierge audits support tickets to identify content gaps and helps maintain your help center efficiently.
By leveraging Helply’s AI-powered tools, support teams can reduce costs, streamline operations, and scale without adding headcount.
If you want to experience the benefits of an intelligent, self-learning support agent, consider integrating Helply into your customer support strategy today.
Get started with Helply now and transform your customer support experience!
FAQs
1. Is agent builder free?
The ChatGPT agent builder platform requires an OpenAI account with billing enabled to access advanced features like agent preview and deployment. While some templates and basic functionalities may be accessible without cost, building and running agents at scale typically involves usage-based fees. To optimize agent performance, map and structure your data by identifying necessary data sources, cleaning, and organizing them effectively.
2. How much does it cost to build an AI agent?
Costs depend on factors such as the complexity of your agent, the number of API calls, model selection (e.g., GPT-4o vs. GPT-5-mini), and integrations used. OpenAI provides detailed pricing on its website, and you can optimize costs by choosing appropriate models and managing usage efficiently.

